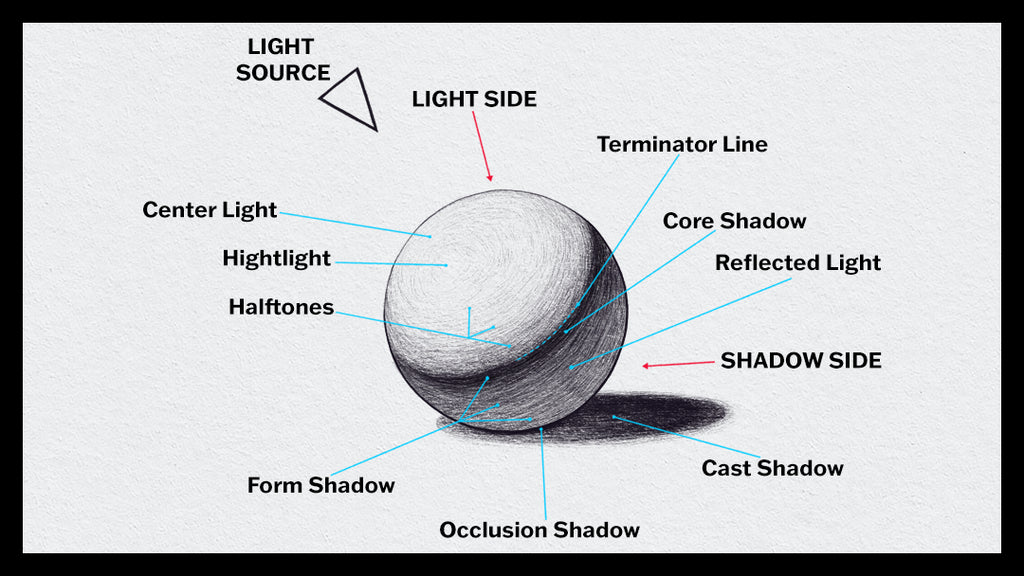
The Anatomy of Light and Shadow

Let there be light! And so there was form.
The greatest-ultimate-foremost-supreme way to make your art appear 3D in a 2D medium is understanding the basics of light, and shadow.
Light and shadow together creates a scale of values, that grants an object the illusion of depth, and volume within a 2D medium such as paper, canvas, or screen. Though it may be a mere illusion, its power cannot be denied!
By knowing and applying the basics of light, and shadow your art will improve greatly giving it life, and depth.
Thou shall turn a circle into a sphere!
Let's begin.

LIGHT SIDE
The side of the object where light is present in different scale of values.
1. Light Source: The direction of the main light source.
Creating the illusion of form using multiple light sources is difficult specially when applied to more complex forms such as the human figure. Always best to start easy, and simple by using one light source.
2. Center Light: Also called direct light, it's the brightest area in the object, because it's facing the light source, and receiving the most illumination.
3. Highlight: An intense bright spot caused by the reflection of the light source.
4. Halftones: The gradual transition of tones (light halftone, mid halftone, and dark halftone) that occurs from the center light going, and ending in the terminator line.
Halftones is used to transition from light to shadow, it creates the most effective illusion of form.
SHADOW SIDE
The side of the object where no direct light is present.
5. Form Shadow: The overall shadow that's on the object.
Tip: The best way to draw the form shadow is by considering the shape, and form of the object.
6. Terminator Line: The line where light ends (light terminator), and form shadow starts. Knowing where the terminator line is located, can help indicate the core shadow.
Tip: Marking this line in the beginning stages of your drawing helps you maintain a systematic, and structured approach, thus preventing any confusion on the light, and shadow areas.
7. Core Shadow: The darkest area in the form shadow, as it receives the least amount of reflected light.
8. Reflected Light: The lightest area in the form shadow, as it is "lighten up" by the light that is bouncing off a surface, and returning to the form shadow, also known as indirect light.
Note: Light source is not hitting the object directly, but indirectly by reflecting from a nearby surface.
Reflected light is the reason the form shadow is not in complete darkness like the occlusion shadow.
9. Occlusion Shadow: The darkest of all shadows, as it is the area that is least affected by direct, and indirect light.
Created by the object coming into full, or near contact with another object/surface. It creates a sense of separation between an object, and the other.
10. Cast Shadow: The shadow an object cast on a surface, created by the object blocking the light from the light source.
Tip: When drawing a cast shadow, its edge closest to the object should be drawn sharp, and defined. As it moves farther away from the object, its edge should be drawn soft, and blurred. Transitioning gradually from a hard edge to a soft edge.
Note: Cast shadow is usually darker than form shadow.
Whether you are working traditionally, or digitally it is without doubt that the anatomy of light, and shadow is an essential element in art that all artist should thoroughly study, and apply in practice.
By understanding and mastering the basic of light and shadow, in time I know you will develop an amazing skill, and tool that you can use in your art to create mesmerizing artwork.
So, go forth now…practice, and create!
SHARE:

